Ok before we begin, I know…using a pasta roller to make dumpling skins is not traditional. I don’t care. Rolling out little nuggets of dough into perfect circles is for little old ladies in dumpling shops, or gyoza artisans where everything has to be as traditional as it was 500 years ago. I prefer to use a pasta roller, since it helps me get perfect circles and even dough thickness.
These gyoza are filled with a simple ground pork and chive mixture, which is a pretty standard filling for both Chinese and Japanese dumplings. Speaking of which, do you know what came first?
The Japanese gyoza is almost the same as the Chinese guotie, which also shares a resemblance to Polish Pierogi, Tibetan Momo, Vietnamese Spring Rolls (kinda), Korean Mandu, Ukrainian Varenyky, and many more. Essentially they are just dumplings, of which most cultures in the world have some variation.
What Is The Difference Between Gyoza And Guotie?
The primary difference between Japanese Gyoza and Chinese Guotie is that the Japanese version tends to have a thinner skin, is a bit smaller in size, and is served with a soy based dipping sauce. The Chinese guotie is more “rustic” in that the skins are a bit thicker and not as uniform and is served with s chili or vinegar based sauce. I remember when I first moved to Beijing and ordered jiaozi (boiled dumplings) and was surprised to get vinegar instead of soy sauce.

Why Do I Use A Pasta Roller?
I’ll admit, I learned the traditional way. I’m not being ignorant in saying it can be quicker to do it the traditional way instead of using a roller. However, that takes years of repetition and practice, and as I don’t make gyoza every day, I cannot get them to exacting measurements.
Is using a pasta roller cheating? To be honest I don’t think so. It is not traditional, but if you’ve ever had pre-made, store bought, frozen dumplings, chances are they were made in a factory that uses similar rollers to punch out circles in a large sheet of dough. Although, knowing China it very well could be a factory the size of a Costco with 10,000 old Chinese ladies hand making dumplings for 14 hours a day.
I use my Imperial pasta roller which is my go to machine for all types of homemade fresh pasta like ravioli, fettuccine, tortellini, and more.

My first time making dumplings in China was with the family of one of my clients back when I worked. It was during Spring Festival, which is a huge holiday where everyone goes home to be with their family. Upon arriving at their place I was presented with a gift. A plastic press similar to the picture above to better help me close the dumplings and still have them look pretty.
While this definitely makes them more uniform, it really is not hard to learn how to fold the dumplings by hand. I think the biggest mistake people make when first starting out is overfilling the dough. A gyoza, or any small dumpling for that matter, only has about a teaspoon of meat filling, otherwise it gets too hard to seal properly
Gyoza Ingredients
Filling
- 500 grams Ground Pork. Pork doesn’t usually have ratios for fat like beef does, but I do try to find stuff that looks like it has a decent amount of fat. As the filling is quite simple, you really want to taste the flavor of the meat.
- 100 grams Chives/Spring Onions; chopped. You can adjust the amount of the chives more or less depending on your palate.
- 2 tbsp Garlic Powder. You can also use fresh minced garlic, but I find the powder is a bit more muted in flavor and is able to be mixed in more evenly
- 1 tsp Salt. More or less to taste.
- Chinese Cabbage; optional. Ok, some may say it’s not optional. I personally don’t like Chinese cabbage so I don’t use it, but if you want you can add however much you want.
Gyoza Wrappers
- 250 grams Flour; hard. Hard flour is essentially a flour with a high gluten content. As we want these wraps to be sealed and pressed, we want something stronger. You can use AP flour, but I like to use Bread Flour as it is a little bit more glutinous when rolled and pressed.
- 125 ml Water; hot. It is imperative that you boil the water before adding it to the flour. I don’t know the science behind it, it is just how I was taught.
- 1/2 tsp Salt.
Gyoza Instructions
I like to make the meat mixture first and set it under plastic wrap in the fridge while I make the wraps. In a bowl just combine all the ingredients and mix it up with your hands similar to making meatballs. When everything is well combined, place some plastic wrap on top and set in the fridge while making the wrappers.

In another bowl, sift the flour. Boil the water in a kettle and add the salt. Then slowly trickle it into the flour mixing with a wooden spoon or whatever you use to mix. When all the water is poured in, use your hands to press and squeeze the dough into a ball. It will be crumbly and broken. This is okay, you didn’t make a mistake.

Knead the dough for like 10-20 minutes. This is the part that takes a lot of work, and a stand mixer dough hook just won’t cut it here (I tried). Really beat and press the dough into submission until you are left with a smooth round glutinous mass.
Traditionally, this is where you would break off some, roll it into a rope, then cut off little nuggets to make individual skins. But we are going to use a pasta roller so every gyoza skin is perfect. Break off a piece of the dough (place the rest under a damp towel) and press it into a somewhat flat rectangle, then feed it through the pasta roller on the largest setting 2 times. Move down to the second setting for another 2 runs, then the third.

By now you may notice that your dough is thin, but not very even, and the edges are cracked. That’s fine. Take the sheet, fold it back over itself twice and press it into another rectangle. Rotate it 90 degrees and feed it back into the machine at the largest setting. Do each level twice before moving down, stopping at the second to last setting on the roller (if you do the last one it will be too thin, more akin to a wanton wrapper for soups).

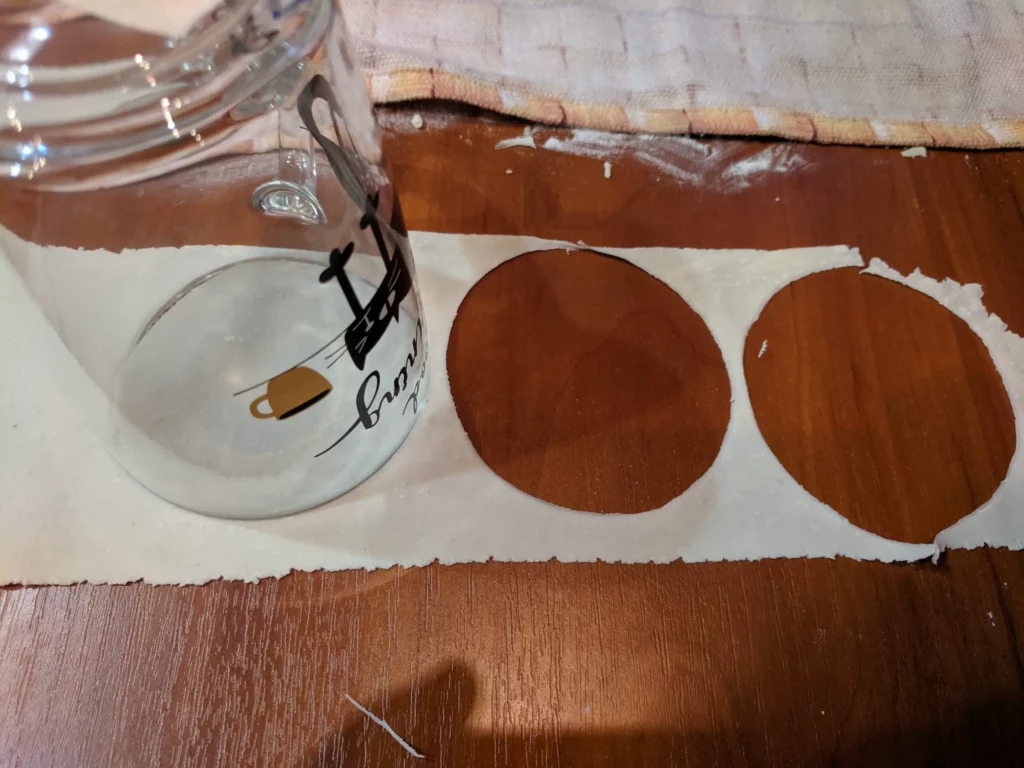
Lay your sheet of dough on the table and taking a cup or a ring mold (cookie cutters work too) cut out a circle of dough. Place these circles under a damp towel so they will not dry out. Roll out and cut all the dough.
Using a teaspoon or chopsticks put a teaspoon sized amount of meat into the center of the wrapper. Dip your finger in some water and run it around the edge of the wrapper. Fold the wrapper in half over the filling and pinch shut. There are tons of ways to fold dumpling wrappers, I just did a simple fold-over press that is most common.

In a skillet on high heat add some sunflower oil and place the dumplings down in the pan. They can be close together but you don’t want them touching. Let fry for about three minutes, then carefully pour in 125 ml of water and quickly put the lid on. This will steam the gyoza. Let steam for another three minutes, take of the lid, and remove the dumplings to a separate plate. Repeat until you have done all the dumplings.


What Else Can You Put Inside?
While ground pork is the traditional method, you can definitely have fun with your fillings. You can use other ground meats, or tofu with vegetables for a vegetarian version. You can use wildly non-Asian ingredients and make a cultural fusion, like using mozzarella and tomatoes with a pesto dipping sauce. Ok, that’s basically just an Italian ravioli. But get creative, you never know what you’ll come up with.

Gyoza (Pasta Roller Hack)
Ingredients
Filling
- 500 grams Ground Pork
- 100 grams Chives
- 2 tbsp Garlic Powder
- 1 tsp Salt
Wrappers
- 240 grams Hard Flour
- 125 ml Water boiling
- 1/2 tsp Salt
Instructions
- I like to make the meat mixture first and set it under plastic wrap in the fridge while I make the wraps. In a bowl just combine all the ingredients and mix it up with your hands similar to making meatballs. When everything is well combined, place some plastic wrap on top and set in the fridge while making the wrappers.
- In another bowl, sift the flour. Boil the water in a kettle and add the salt. Then slowly trickle it into the flour mixing with a wooden spoon or whatever you use to mix. When all the water is poured in, use your hands to press and squeeze the dough into a ball. It will be crumbly and broken. This is okay, you didn’t make a mistake.
- Knead the dough for like 10-20 minutes. This is the part that takes a lot of work, and a stand mixer dough hook just won’t cut it here (I tried). Really beat and press the dough into submission until you are left with a smooth round glutinous mass.
- Traditionally, this is where you would break off some, roll it into a rope, then cut off little nuggets to make individual skins. But we are going to use a pasta roller so every gyoza skin is perfect. Break off a piece of the dough (place the rest under a damp towel) and press it into a somewhat flat rectangle, then feed it through the pasta roller on the largest setting 2 times. Move down to the second setting for another 2 runs, then the third.
- By now you may notice that your dough is thin, but not very even, and the edges are cracked. That’s fine. Take the sheet, fold it back over itself twice and press it into another rectangle. Rotate it 90 degrees and feed it back into the machine at the largest setting. Do each level twice before moving down, stopping at the second to last setting on the roller (if you do the last one it will be too thin, more akin to a wanton wrapper for soups).
- Lay your sheet of dough on the table and taking a cup or a ring mold (cookie cutters work too) cut out a circle of dough. Place these circles under a damp towel so they will not dry out. Roll out and cut all the dough.
- Using a teaspoon or chopsticks put a teaspoon sized amount of meat into the center of the wrapper. Dip your finger in some water and run it around the edge of the wrapper. Fold the wrapper in half over the filling and pinch shut. There are tons of ways to fold dumpling wrappers, I just did a simple fold-over press that is most common.
- In a skillet on high heat add some sunflower oil and place the dumplings down in the pan. They can be close together but you don’t want them touching. Let fry for about three minutes, then carefully pour in 125 ml of water and quickly put the lid on. This will steam the gyoza. Let steam for another three minutes, take of the lid, and remove the dumplings to a separate plate. Repeat until you have done all the dumplings.